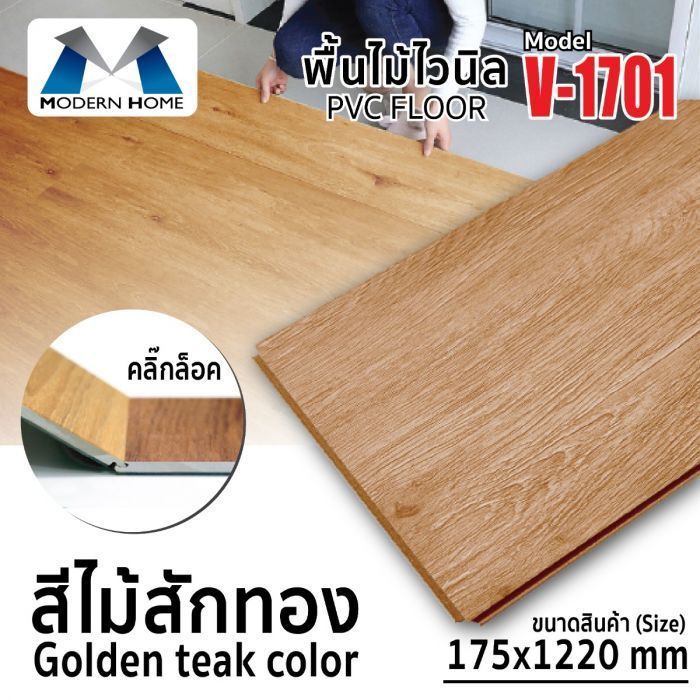
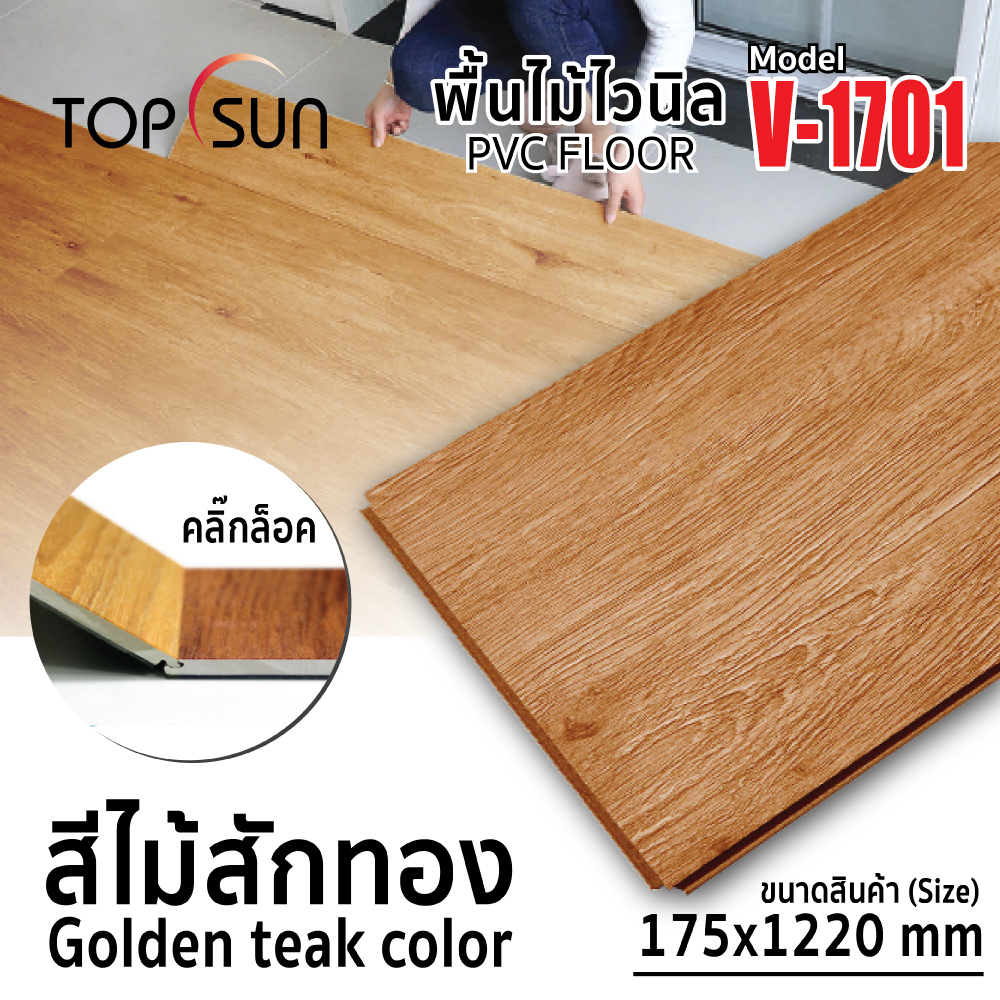
พื้นไม้ไวนิล คลิ๊กล็อค สีไม้สักสีทอง รุ่น V-1701
PVC floor “Click Lock” Golden teak color model V-1701
สินค้าที่เกี่ยวข้อง
เลือกสินค้าที่ต้องการใส่รถเข็นหรือ
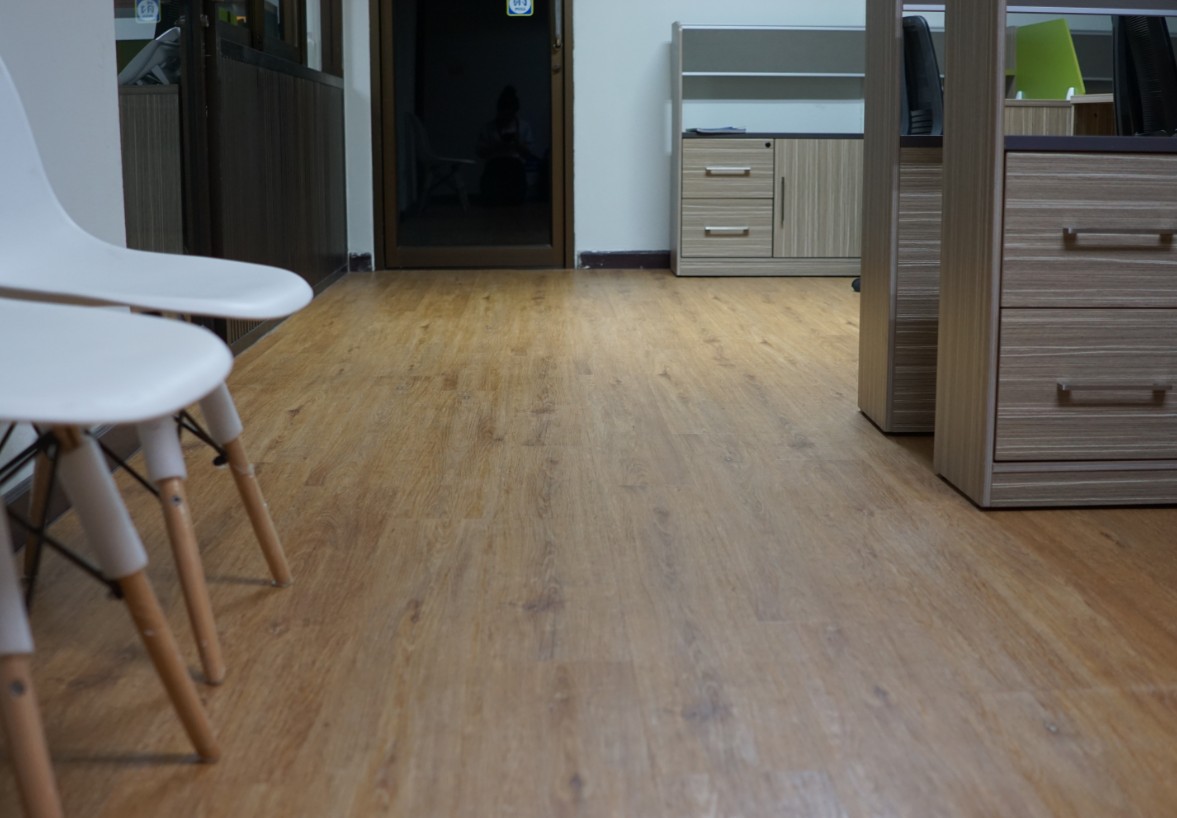
ภาพใช้จริง
จากออฟฟิศของเรา

พื้นไม้ไวนิล รุ่น V-1701
PVC floor Model V-1701
พื้นไม้ไวนิลเหมาะสำหรับ (Suitabel for)
- เหมาะสำหรับบ้านพักอาศัย ห้องนอน ห้องนั่งเล่น ห้องครัว และอาคารทั่วไป เนื่องจาก มีน้ำหนักเบา มีลายให้เลือกมากมาย โดนน้ำได้ กันความชื้นได้ดี ไม่มีปลวก อายุการใช้งานยาวนานเกิน 10ปี
- Suitable for homes bedrooms living rooms kitchen and common buildings can hit the water, can protect against moisture, no termites and lifetime for more than 10 years.
รายละเอียดสินค้า (Specification)
พื้นไม้ไวนิล รุ่น V-1701
| วัสดุ (Material) | ไวนิล (Vinyl) |
| ขนาดสินค้า (Size) | 175x1220 mm |
| ความหนา (Thickness) | 4 mm |
| ชั้นปกป้อง พื้นผิวไวนิล (Wear layer) | 0.3 mm |
| น้ำหนักสินค้า (Weight) | 1.5 Kg/Pc |
| น้ำหนักรวมสุทธิ (Gross Weight) | 18.5 Kg/Pc |
วิธีใช้งาน พื้นไม้ไวนิล รุ่น V-1701 (How to use)
วิธีเตรียมพื้นก่อนติดตั้ง (How to prepare the floor before installation)
- ให้วัดระดับและเช็ครอยต่อให้เสมอ ถ้าไม่เรียบให้เทปรับระดับพื้นก่อนติดตั้งให้เสมอกัน จากนั้นเว้นระยะก่อนปู พื้นไม้ไวนิล 10 วัน
- เช็คความชื้นก่อนปู โดยการเอากระดาษหนังสือพิมพ์ปูพื้นที่ต้องการปู พื้นไม้ไวนิล พร้อมติดเทปกาวทิ้งไว้ 48 ชม. หากกระดาษหนังสือพิมพ์เปียก ไม่แนะนำให้ปู พื้นไม้ไวนิล
- ตัด พื้นไม้ไวนิล 5x50 ซม. และทดสอบปูเป็นเวลา 48 ชม. ถ้าแผ่น พื้นไม้ไวนิล ไม่มีการร่อนออกไม่มีการเด้งสามารถปูได้
- ใช้ชามครอบพื้นไว้ 48 ชม. ถ้าไม่มีไอน้ำที่ชาม สามารถปูได้
- Check the level and check the joints if not smooth, pour the floor level before installation, then leave before 10 days.
- Check moisture before paving by paving newspapers and adhesive tape 48 hours if the newspapers are wet. don’t recommend paving PVC floor.
- Cut the PVC floor 5x50 cm. and test paving 48 hours if the PVC floor is not sifting out, no bounce can be paving.
- Use a bowl cover floor 48 hour if there is no steam at the bowl it can be paving.
การติดตั้ง (Installaiton)
- เริ่มต้นติดตั้งที่มุมก่อน โดยการวาง พื้นไม้ไวนิล แผ่นแรกที่มีด้านลิ้นหันหน้าไปทางผนัง ใช้แผ่นรองพื้นตามผนังแต่ละด้านเพื่อรักษาพื้นที่การขยายตัว 8-12 มิลลิเมตร (5/16 นิ้ว 3/8 นิ้ว) ระหว่างผนังกับพื้น
- การยึด พื้นไม้ไวนิล แผ่นที่สองให้ใส่ลิ้นปลายเข้ากับร่องท้ายของ พื้นไม้ไวนิล แผ่นแรกที่มุม ประมาณ 15-20 องศา เมื่อลดลงพื้นไม้ไวนิลจะคลิ๊กเข้าล็อคและวางพื้นไม้ไวนิลลงเป็นแนวราบกับพื้น
- ต่อแถวแรกจนกว่าจะถึงสุดแถว ถ้า พื้นไม้ไวนิล แผ่นสุดท้ายเหลือ ให้หมุน พื้นไม้ไวนิล 180 องศา และให้วัดและทำเครื่องหมาย แล้วใช้ไม้บรรทัดและมีดยูทิลิตี้ทำการกรีดพื้นไม้ไวนิลและหักออก
- เริ่มต้นแถวถัดไปโดยใช้ชิ้นตัดชิ้นงานจากการตัดแถวก่อนหน้านี้ ชิ้นงานควรมีความยาวไม่ต่ำกว่า 20 ซม. (8 นิ้ว) และต่อร่วมกันควรมีความยาวอย่างน้อย 40 ซม. (16 นิ้ว).
- ต่อแผ่น พื้นไม้ไวนิล ให้จนครบเสร็จสิ้น
- Start in a corner by placing the first plank with the tongue side facing the wall. Use spacers along each wall to maintain an expansion space of 8-12 mm (5/16 in 3/8 in) between the wall and the flooring.
- To attach the second plank, insert the end tongue into the end groove of the very first plank at an angle of approx. 15-20 degrees. When lowered, the plank will click into place. Line up edges carefully. The planks should be flat to the floor.
- Continue connecting the first row until you reach the last full plank Fit the last plank by rotating the plank 1800 with the pattern side upward, place beside row. Measure and mark, then using a ruler and utility knife, score the plank and snap off. Attach as described above.
- Begin the next row with the off-cut piece from the previous row to stagger the pattern. Pieces should be a minimum of 20 cm (8 in) long and joint offset should be at least 40 cm (16 in).
- continue to finish.
ข้อแนะนำ (Suggestion)
- ต้องปรับระดับพื้นผิวให้เท่ากัน ก่อนทำการปู พื้นไม้ไวนิล
- พื้นที่มีความชื้นสูง ไม่เหมาะสมสำหรับปู พื้นไม้ไวนิล
- หลีกเลี่ยงการโดนแสงแดดโดยตรงเป็นระยะเวลานาน
- ใช้ผ้าม่านเพื่อลดแสงแดดโดยตรงในช่วงเวลาที่แสงแดดจัด
- The surface must be leveled before paving PVC floor.
- High humidity areas not suitable for PVC floor.
รายละเอียดสินค้า/Specification
วัสดุ: ไวนิล | Material: vinyl |
ขนาด:17.5x122 ซม. | Size: 17.5x122 cm. |
ความหนา: 4 มม. | Thickness: 4 mm. |
ชั้นปกป้องพื้นผิว: 0.3 มม. | Wear layer: 0.3 mm. |
แพ็คเกจ: 12 แผ่น/กล่อง | Package: 12 sheets/box |
น้ำหนัก: 18.5กก. | Weight: 18.5kg. |
สินค้าที่ใกล้เคียง